
air compressor troubleshooting guide pdf
Air Compressor Troubleshooting Guide: A Comprehensive Overview
This comprehensive guide details diagnosing and fixing common air compressor issues, ensuring optimal performance and minimizing downtime, utilizing a troubleshooting guide in PDF format.
Expert advice helps resolve problems like power supply failures, low pressure, leaks, and overheating, referencing symptom tables for efficient air compressor troubleshooting.
Downloadable PDF resources offer detailed steps, component analysis, and preventative maintenance schedules, aiding in effective repair and long-term compressor health.
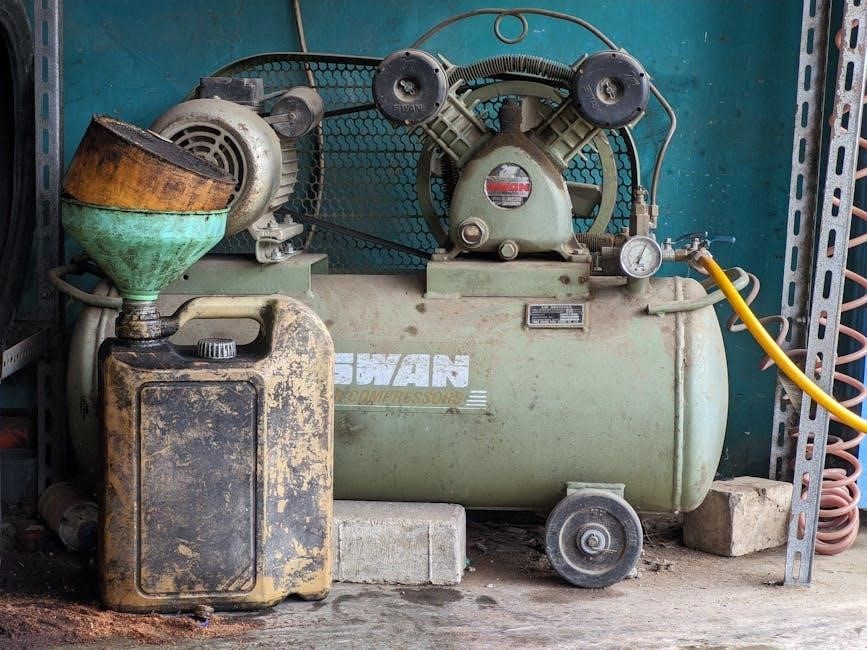
Air compressors, vital in countless applications, frequently encounter operational challenges, demanding swift and accurate troubleshooting. Common problems range from simple power failures and frustratingly low air pressure to more complex issues like leaks, overheating, and complete operational standstill. A readily accessible air compressor troubleshooting guide, often available in PDF format, becomes an invaluable resource for both DIY enthusiasts and professional technicians.
These guides systematically address potential faults, offering step-by-step diagnostic procedures and repair solutions. Understanding the core components – the pump, motor, tank, pressure switch, and regulator – is crucial. Many PDF guides include detailed diagrams and symptom tables, streamlining the identification process. Proactive maintenance, as outlined in these resources, significantly reduces the likelihood of unexpected breakdowns, extending the compressor’s lifespan and ensuring consistent performance. Ignoring early warning signs can escalate minor issues into costly repairs or complete compressor failure.

Understanding Air Compressor Types
Air compressors aren’t one-size-fits-all; different types require tailored troubleshooting approaches. A comprehensive air compressor troubleshooting guide, often found as a PDF download, emphasizes this distinction. Reciprocating compressors, common for home use, rely on pistons, while rotary screw compressors are favored for industrial applications due to their continuous airflow and durability. Oil-lubricated compressors demand attention to oil levels and quality, while oil-free models require specific filter maintenance.
PDF guides detail the unique vulnerabilities of each type. For instance, reciprocating compressors are prone to valve issues, while rotary screw models may experience problems with seals. Understanding the compressor’s design – single-stage versus two-stage – also impacts troubleshooting. Two-stage compressors, delivering higher pressure, necessitate more intricate diagnostics. A well-structured guide will categorize issues by compressor type, ensuring accurate and effective repair procedures.

Common Air Compressor Problems & Solutions
This section details frequent issues—power failures, low pressure, leaks, overheating—and provides solutions, often detailed within a downloadable air compressor troubleshooting guide PDF.
Compressor Won’t Start – Power Supply Checks
Initial troubleshooting for a non-starting compressor focuses on the power supply; a detailed air compressor troubleshooting guide PDF often begins here. First, verify the compressor is securely plugged into a functioning power outlet, and test the outlet with another device.
Next, inspect the circuit breaker or fuse box, ensuring the dedicated circuit hasn’t tripped or the fuse blown. Reset the breaker or replace the fuse if necessary. Examine the power cord for any visible damage – cuts, fraying, or exposed wires – and replace it if compromised.
Consult your PDF guide for specific wiring diagrams and voltage requirements. A multimeter can confirm voltage is reaching the compressor’s motor. If power is present, the issue may lie within the motor or pressure switch, requiring further investigation as outlined in the troubleshooting guide.
Low Air Pressure – Identifying the Cause
Addressing low air pressure begins with consulting your air compressor troubleshooting guide PDF. A common culprit is an air leak – inspect all fittings, hoses, and connections for hissing sounds or visible moisture, indicating escaping air. Tighten loose connections or replace damaged components.
Next, examine the air filter; a clogged filter restricts airflow, reducing compressor output. Clean or replace the filter as recommended in the PDF guide. Verify the pressure switch is functioning correctly, ensuring it’s reaching the cut-off pressure.
Also, check the check valve, which prevents air from flowing back into the compressor. A faulty check valve allows pressure loss. The troubleshooting guide will detail testing procedures. Finally, consider the compressor’s capacity – is it sufficient for your application?
Compressor Runs But No Air is Delivered
When the compressor runs without delivering air, your air compressor troubleshooting guide PDF is invaluable. A primary suspect is a malfunctioning check valve; this component prevents backflow, and failure means no air reaches the tank. The PDF will illustrate how to test and replace it.
Inspect the compressor pump itself. Internal wear or damage can prevent it from building pressure. Refer to the guide for diagnostic steps. A blocked discharge line or hose can also cause this issue – check for obstructions.
Furthermore, verify the unloader valve is functioning correctly. This valve releases pressure when the compressor isn’t running, and a stuck valve can prevent air delivery. The troubleshooting PDF provides detailed diagrams and repair instructions.
Air Compressor Leaks – Finding and Fixing
Air compressor leaks significantly reduce efficiency and can be dangerous. Your air compressor troubleshooting guide PDF is crucial for pinpointing the source. Begin by visually inspecting all connections – hoses, fittings, and the tank itself. Soapy water applied to suspected areas will reveal even small leaks as bubbles.
The PDF details how to tighten fittings, replace worn hoses, and address tank corrosion. A leaking pressure switch or safety valve requires immediate attention; the guide provides specific repair or replacement instructions.
Internal leaks are more challenging to diagnose. The troubleshooting PDF outlines methods for testing the compressor head and valves. Remember to always disconnect the power supply before attempting any repairs, as detailed in the safety section of the guide.
Overheating Issues – Prevention and Resolution
Air compressor overheating can cause significant damage and reduce lifespan. Your air compressor troubleshooting guide PDF emphasizes preventative measures, starting with adequate ventilation. Ensure the compressor isn’t enclosed in a confined space, allowing for proper airflow. Regularly cleaning the cooling fins, as detailed in the PDF, is vital.
If overheating occurs, the guide instructs you to immediately shut down the compressor and allow it to cool. The PDF explains how to check the thermal overload protector, a key safety feature. A malfunctioning protector needs replacement.
The troubleshooting PDF also covers checking the oil level (for oil-lubricated compressors) and ensuring proper belt tension. Ignoring overheating can lead to costly repairs; consult the guide for detailed diagnostic steps.

Detailed Troubleshooting Steps
This section, guided by your air compressor troubleshooting guide PDF, provides systematic diagnostics for common issues, ensuring efficient repair and optimal performance.
Checking the Power Supply & Circuit Breaker
Begin troubleshooting by verifying the power supply, a crucial first step detailed in your air compressor troubleshooting guide PDF. Ensure the compressor is securely plugged into a functioning power outlet, and that the outlet itself is receiving power.
Next, inspect the circuit breaker dedicated to the air compressor. A tripped breaker indicates an overload, potentially caused by the compressor itself or other devices on the same circuit. Reset the breaker if necessary, but if it trips again immediately, investigate for underlying electrical issues.
Utilize a voltage tester to confirm the correct voltage is reaching the compressor. Low voltage can prevent startup or cause erratic operation. Refer to your PDF guide for specific voltage requirements for your compressor model. Damaged power cords should be replaced immediately for safety and functionality.
Inspecting the Air Filter – Cleaning or Replacement
A clogged air filter significantly restricts airflow, reducing compressor efficiency and potentially causing overheating – details readily available in your air compressor troubleshooting guide PDF. Locate the air filter, typically housed near the compressor intake.
Remove the filter and visually inspect it for dirt, dust, and debris. If the filter is lightly soiled, attempt cleaning it by gently tapping it to dislodge particles or using low-pressure compressed air, blowing from the inside out.
However, heavily soiled or damaged filters must be replaced. Using a dirty filter compromises air quality and compressor performance. Your PDF guide will specify the correct filter type and replacement intervals. Regular filter maintenance is a simple yet vital preventative measure.
Examining the Pressure Switch – Functionality Test
The pressure switch controls the compressor’s operation based on tank pressure; a malfunctioning switch is a common issue detailed in your air compressor troubleshooting guide PDF. Locate the switch, usually near the tank, and disconnect power before proceeding.
Visually inspect the switch for damage or corrosion. Using a multimeter (refer to your PDF for safe testing procedures), check for continuity across the switch terminals at both cut-in and cut-out pressure settings.
Adjusting the pressure switch may resolve minor issues, but replacement is often necessary if it fails the continuity test. Always consult the PDF guide for specific adjustment instructions and safety precautions. A properly functioning pressure switch ensures safe and efficient compressor operation.
Testing the Check Valve – Ensuring Proper Operation
The check valve, crucial for maintaining tank pressure, prevents air from flowing back into the compressor when it’s off – detailed procedures are found in your air compressor troubleshooting guide PDF. Locate the valve, typically between the compressor pump and the air tank.
Disconnect power before testing. Air should flow freely from the compressor to the tank through the valve, but not in the reverse direction. A simple test involves attempting to blow air back through the valve; it should resist airflow.
If the valve leaks, replace it immediately, referencing the PDF for the correct replacement part and installation instructions. A faulty check valve leads to pressure loss and compressor inefficiency, potentially causing frequent cycling.
Analyzing the Compressor Pump – Wear and Tear
The compressor pump is the heart of the system, and assessing its condition is vital – consult your air compressor troubleshooting guide PDF for detailed inspection procedures. Listen for unusual noises like rattling or excessive vibration during operation, indicating potential internal wear.
Visually inspect the pump for signs of damage, such as cracks or oil leaks. Check piston rings and cylinder walls for wear, often requiring disassembly (refer to the PDF for guidance). Reduced pumping capacity and inability to reach desired pressure are key indicators of pump deterioration.
Severe wear necessitates pump replacement. The PDF will outline compatible pump models and provide step-by-step replacement instructions, ensuring proper functionality and extending the compressor’s lifespan.
Diagnosing Belt Issues – Tension and Condition

Proper belt tension and condition are crucial for efficient compressor operation; your air compressor troubleshooting guide PDF provides specific guidance. A loose belt will slip, reducing pumping capacity and causing overheating, while an overtightened belt strains the motor and pump bearings.
Inspect the belt for cracks, fraying, or glazing – signs of wear requiring replacement. The PDF details how to check belt tension using a belt tension gauge or deflection method. Correct tension ensures optimal power transfer and prevents premature wear.
Refer to the PDF for recommended belt types and replacement procedures. A worn or damaged belt significantly impacts performance and should be addressed promptly to avoid further damage to the compressor system.

Specific Air Compressor Component Troubleshooting
Detailed component analysis, found within your air compressor troubleshooting guide PDF, covers regulators, tanks, motors, and capacitors for targeted repair solutions.
Expert guidance aids in diagnosing issues and restoring optimal performance across all critical compressor parts.
Troubleshooting the Pressure Regulator
The pressure regulator maintains consistent air delivery, but malfunctions can cause inconsistent performance; a troubleshooting guide PDF is invaluable here.
First, check for debris obstructing the regulator’s diaphragm, potentially causing erratic pressure fluctuations; cleaning often resolves this. Second, inspect the regulator’s adjustment knob – ensure it turns smoothly and accurately reflects the gauge reading.
If the regulator fails to build pressure, examine the inlet filter for blockage. Conversely, if it over-pressurizes, the diaphragm might be damaged, requiring replacement. Utilize the PDF’s diagrams to identify components and understand their function.
A faulty regulator can lead to tool inefficiency or damage; therefore, accurate diagnosis and repair are crucial. Remember to disconnect power before any inspection or repair work, prioritizing safety.
Finally, consult the PDF’s section on regulator calibration to ensure precise pressure settings after repair, maximizing compressor efficiency and tool performance.
Addressing Issues with the Air Tank
The air tank stores compressed air, and problems here can severely impact compressor function; a detailed troubleshooting guide PDF is essential for safe and effective diagnosis.
First, meticulously inspect the tank for any signs of corrosion, rust, or physical damage – these compromise structural integrity and pose safety risks. Second, check the drain valve; a malfunctioning valve prevents water removal, leading to internal corrosion.
If the tank isn’t holding pressure, suspect a leak at a weld point or the safety valve. Utilize soapy water to pinpoint the leak’s exact location, referencing the PDF’s diagrams.
Never attempt to weld a damaged tank; replacement is the only safe option. Always adhere to the PDF’s safety guidelines regarding tank inspection and repair.
Regular draining and inspection, as outlined in the PDF’s maintenance schedule, are crucial for extending tank life and preventing catastrophic failure.
Diagnosing Problems with the Motor
The motor is the heart of the compressor, and diagnosing its issues requires a systematic approach, best guided by a comprehensive troubleshooting guide PDF.
Initially, verify the power supply to the motor, checking for tripped breakers or blown fuses. Next, listen for unusual noises – humming, grinding, or clicking – which indicate potential internal problems.
If the motor fails to start, inspect the capacitor (see dedicated section) and check for open windings using a multimeter, as detailed in the PDF. Overheating is another common issue; ensure adequate ventilation.
A burnt smell often signifies winding damage, necessitating motor replacement. The PDF provides detailed wiring diagrams and safety precautions for motor testing and repair.
Remember, motor repairs can be complex and potentially dangerous; consult a qualified technician if you’re uncomfortable performing these tasks, referencing the PDF’s warnings.
Solving Capacitor Problems
Capacitors are crucial for motor starting, and failure is a frequent issue; a detailed troubleshooting guide PDF is invaluable for diagnosis.
Symptoms include the motor humming but not starting, or a slow, labored start. Always disconnect power before handling capacitors – they store a dangerous charge! Use a capacitor discharge tool to safely release this energy, as outlined in the PDF.
Visually inspect the capacitor for bulging, leaking, or physical damage. Testing with a multimeter (capacitance mode) reveals if it’s within the specified range, detailed in the PDF’s specifications.
Replacement requires matching the voltage and capacitance ratings precisely. The PDF provides wiring diagrams and safety instructions for proper installation. Incorrect replacement can damage the motor.
Remember, capacitor issues are common, but safety is paramount; consult the PDF and a qualified technician if unsure about any step.
Advanced Troubleshooting & Maintenance
Utilizing a PDF guide, delve into internal leak repair, thermal overload protection, and preventative schedules for optimal performance and longevity of your compressor.
Identifying and Repairing Internal Leaks
Internal air compressor leaks significantly reduce efficiency and pressure output, demanding prompt attention guided by a detailed PDF troubleshooting guide. Begin by isolating the leak’s source – often fittings, valves, or the compressor head itself. A soapy water solution applied to suspected areas reveals escaping air bubbles, pinpointing the exact location.
Once identified, disconnect the power supply before attempting any repairs. Tighten loose fittings cautiously, avoiding over-tightening which can cause damage. For valve leaks, replacement is typically necessary, referencing the PDF for specific part numbers and installation instructions. Compressor head leaks often indicate worn piston rings or valve seats, requiring professional servicing or component replacement.
Always consult the air compressor troubleshooting guide PDF for exploded diagrams and torque specifications to ensure correct reassembly and prevent future leaks. Regular inspection and preventative maintenance, as outlined in the PDF, can minimize the occurrence of internal leaks and extend the compressor’s lifespan.
Understanding Thermal Overload Protection
Thermal overload protection is a crucial safety feature in air compressors, preventing motor damage from overheating. This system, detailed in your air compressor troubleshooting guide PDF, utilizes a thermal overload switch that automatically shuts off the motor when it reaches a critical temperature. Frequent tripping indicates underlying issues, not a faulty switch itself.
Common causes include restricted airflow due to a dirty air filter, excessive use, or a malfunctioning cooling fan. The PDF guide emphasizes the importance of regular air filter cleaning and ensuring adequate ventilation around the compressor. Before resetting the overload switch – always disconnect power – address the root cause of the overheating.
Consult the troubleshooting guide PDF for specific reset procedures and wiring diagrams. Ignoring repeated thermal overload trips can lead to permanent motor failure. Preventative maintenance, as outlined in the PDF, is key to maintaining optimal motor temperature and preventing overload situations.
Preventative Maintenance Schedule

A consistent preventative maintenance schedule, detailed within your air compressor troubleshooting guide PDF, significantly extends the lifespan and efficiency of your compressor. The PDF recommends daily checks for leaks, unusual noises, and proper oil levels (for oil-lubricated models). Weekly tasks include draining the tank to prevent corrosion and inspecting the air filter for debris.
Monthly maintenance, as outlined in the PDF, should encompass belt tension checks, tightening connections, and a thorough cleaning of the compressor’s exterior. Annually, the troubleshooting guide PDF advises inspecting the check valve, pressure switch, and internal components for wear and tear.
Following this schedule minimizes downtime and costly repairs. The PDF often includes a printable checklist for easy tracking. Remember, proactive maintenance is far more economical than reactive repairs, ensuring reliable performance for years to come.
Using a PDF Troubleshooting Guide Effectively
A comprehensive air compressor troubleshooting guide PDF is an invaluable resource for both novice and experienced users. Begin by familiarizing yourself with the compressor’s components, often visually represented within the PDF. Utilize the table of contents to quickly locate sections relevant to your specific issue.
Pay close attention to symptom-based troubleshooting charts within the PDF; these guide you through a logical diagnostic process. Downloaded PDF guides frequently include exploded diagrams, aiding in parts identification and repair.
Remember to prioritize safety precautions detailed in the PDF before attempting any repairs. Utilize the search function to quickly find specific keywords or error codes. Regularly updating your PDF ensures access to the latest information and best practices for optimal compressor maintenance.

Safety Precautions When Troubleshooting
Always disconnect power before repairs, referencing the air compressor troubleshooting guide PDF for detailed steps; proper tool use is essential for safe and effective maintenance.
Disconnecting Power Before Repairs
Prior to initiating any troubleshooting or repair work on your air compressor, meticulously disconnect the power supply – this is paramount for safety, as detailed in most air compressor troubleshooting guide PDF documents. Ensure the compressor is unplugged from the electrical outlet, and if hardwired, the corresponding circuit breaker is switched off.
Double-check with a voltage tester to confirm the absence of electrical current before proceeding. Ignoring this crucial step poses a significant risk of electric shock or severe injury. The PDF guide will often emphasize this point with warning symbols.
Furthermore, depressurize the air tank by opening the drain valve to release any remaining compressed air. This prevents accidental discharge during disassembly. Always consult the troubleshooting guide PDF specific to your compressor model for detailed instructions and safety recommendations, as procedures can vary.
Proper Use of Tools and Equipment
Employing the correct tools is vital when troubleshooting and repairing your air compressor, as highlighted in most air compressor troubleshooting guide PDF resources. Utilize appropriately sized wrenches, sockets, and screwdrivers to prevent damage to components. Always wear safety glasses to protect your eyes from debris.
A multimeter is essential for electrical testing, while a pressure gauge verifies system performance. Refer to the PDF guide for specific tool recommendations for your compressor model. Never modify tools or use them for unintended purposes.
Ensure all equipment is in good working order before use. A troubleshooting guide PDF will often include diagrams illustrating proper tool application. Prioritize quality tools for safety and efficiency, and always follow manufacturer’s instructions for operation and maintenance.